March 29, 2011

Lemony Deliciousness!

Sometimes, the relationship I have with my sister is just freaky.  For instance, on more than occasion, we have started singing the exact same song in the exact place at the exact same time.  I kid you not.  We are just that in tune with each other.  

The other day we were talking about what we wanted to bake, and I suggested Starbucks Lemon Loaf.  Apparently, she had been craving that bread just a couple of days before, and she was super excited to find out I had the recipe for it.

While it did not turn out as lemony as the Starbucks version, this Top Secret Recipes version was really moist and delicious.  Just look at the picture if you don't believe me!


Top Secret Recipes Version of Starbucks Lemon Loaf


Ingredients:


Lemon Loaf-
1-1/2 cups all-purpose flour
1/2 teaspoon baking powder
1/2 teaspoon baking soda
1/2 teaspoon salt
3 eggs
1 cup sugar
2 tablespoons butter, softened
1 teaspoon vanilla extract
1 teaspoon lemon extract
1/3 cup lemon juice
1/2 cup vegetable oil


Lemon Icing-
1 cup plus 1 tablespoon powdered sugar
2 tablespoons whole milk
1/2 teaspoon lemon extract


Directions:
1.  Preheat oven to 350 degrees.
2.  To make the loaf, combine the flour, baking powder, baking soda and salt in a large bowl.
3.  Use an electric mixer to blend together eggs, sugar, butter, extracts and lemon juice in a medium bowl.
4.  Pour the wet ingredients into the dry ingredients and blend until smooth.  Add the oil and mix well.
5.  Pour the ingredients into a well-greased 8-1/2 by 4-1/2 inch loaf pan.  Bake for 45 minutes or until a toothpick stuck into the center of the loaf comes out clean.
6.  Make the lemon icing by combining the ingredients in a small bowl with an electric mixer on low speed.  When the loaf has cooled, remove it from the pan and frost the top with the lemon icing.  When the icing has set up, slice the loaf into 8 1-inch-thick slices.


Source: Top Secret Recipes Unlocked by Todd Wilbur

March 28, 2011

How do they make that orange sauce?

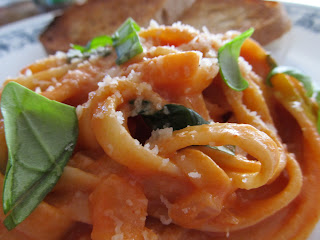
When I was studying in Spain during college, I remember walking home from school after my morning classes, eagerly anticipating the 2 o'clock mid-day meal and looking forward to the delicious lunch my host mother was sure to be preparing.  My roommate and I were always very excited to return home from a long morning at school to find that it was pasta day.  One of the two pasta dishes that my host mother regularly prepared had an orange-colored sauce.  It baffled me that it wasn't red like "normal" pasta sauces, and I had no idea how she made it.

When I saw this recipe on The Pioneer Woman's blog, it reminded me so much of the pasta sauce that my host mother made.  I knew I had to try it.  It turned out to be similar to what I remembered, but not exactly the same.  Regardless, this pasta was really tasty.  I rarely think that a pasta is not tasty though.

       
Pasta with Tomato Cream Sauce

Ingredients:
1 Tablespoon olive oil
1 Tablespoon butter
1/2 of a medium onion, finely diced
2 cloves garlic, minced
1 can (15 ounces) tomato sauce
salt and pepper, to taste
dash of sugar, or to taste
1/2 cup heavy cream
grated Parmesan cheese, to taste
fresh basil, chopped
3/4 pound fettuccine

Directions:
1.  Cook pasta according to package directions.  Drain; reserve 1 cup of pasta water.
2.  Meanwhile, heat butter and oil over medium heat.  Add onions and garlic and saute for a minute.  Pour in tomato sauce and add salt, pepper and sugar to taste.  Stir and cook over low heat for 25 to 30 minutes.  
3.  Remove sauce from heat.  Stir in cream.  Add cheese to taste and check seasonings.  Stir in pasta.  Thin with the pasta water if necessary.  Stir in basil and serve immediately.

Source:  The Pioneer Woman Cooks; http://thepioneerwoman.com/cooking

March 25, 2011

Something's fishy here...

I can count on two fingers the number of times I've cooked fish...once was last Friday when I made fish tacos, and the other was tonight!  Since it's Lent, and we Catholics are discouraged from eating meat on Fridays, I thought it would be a good time to try out my fish-cooking skills...well, that and my dad said something along the lines of, "Let's have salmon this week."

So, salmon it is!  I immediately went on the hunt for a salmon recipe, and Taste of Home didn't let me down.  I had no idea it was so easy to cook fish!  For those of you who are unfamiliar with it and uneasy about it, give it a try.  It was even easier than cooking chicken.  The glaze in this recipe gave the salmon a sweet flavor and made the fillets a little crispy on top...yum!


Glazed Salmon

Ingredients:
1/3 cup packed brown sugar
1/4 cup unsweetened pineapple juice
2 tablespoons soy sauce
4 salmon fillets (6 ounces each)

Directions:
1.  Line a baking pan with foil; grease the foil.  Set aside.
2.  In a small bowl, combine the brown sugar, pineapple juice and soy sauce.
3.  Place salmon skin side down on prepared pan.  Spoon sauce mixture over fish.
4.  Bake, uncovered, at 350 degrees for 20-25 minutes or until fish flakes easily with a fork, basting frequently with pan juices.

Source:  Taste of Home, www.tasteofhome.com

March 23, 2011

Gravy!

I'm not going to lie, I've never actually been a huge fan of gravy.  Whenever it was available, I would usually bypass it and just eat my mashed potatoes without gravy.  Crazy, right?!  

This gravy, however, has totally changed my perspective.  It was loaded with garlic and other seasonings...ok, maybe not "loaded," but it definitely had enough to give it a really great flavor.  I wholeheartedly recommend this recipe.  It was delicious and very easy to prepare.  Just serve it up with some mashed potatoes and steamed veggies...glorious! 


Garlic Chicken 'n' Gravy

Ingredients:
4 boneless skinless chicken breast halves (4 ounces each)
1/4 teaspoon salt
1/4 teaspoon pepper
5 garlic cloves, peeled and chopped
2 tablespoons butter
1/2 cup plus 2 tablespoons chicken broth, divided
1/2 cup white wine or additional chicken broth
1/2 teaspoon dried basil
1/4 teaspoon oregano
1 tablespoon all-purpose flour

Directions:
1.  Sprinkle chicken with salt and pepper.  In a large skillet, cook chicken and garlic in butter over medium-high heat for 5 minutes or until browned.  Add 1/2 cup broth, wine or additional broth, basil and oregano.  Bring to a boil.  Reduce heat; cover and simmer for 7-9 minutes or until chicken is no longer pink.
2.  Remove chicken with a slotted spoon and keep warm.  In a small bowl, combine flour and remaining broth until smooth; stir into pan juices.  Bring to a boil; cook and stir for 1-2 minutes or until thickened.  Serve over chicken.

Source:  Taste of Home, www.tasteofhome.com

March 19, 2011

Spiced Fruity Oatmeal

Recently, I have really gotten into eating oatmeal.  I never used to eat it because I love cereal so much.  I could seriously eat cereal for every meal of the day (I think I've actually done that before!).  I've realized that oatmeal is probably much healthier for me though, so I've been eating it every now and then and experimenting with different add-ins.

As I was looking through a Cooking Light cookbook, I came across a recipe that used apple juice for the liquid in the oatmeal.  Genius!  It sounded so fruity and delicious that I knew I had to give it a try.

After the first attempt, I decided I needed to tweak the recipe a bit for my tastes.   The second time I made it, it was perfect!

    
Spiced Fruity Oatmeal

Ingredients:
1/2 cup apple juice
1/2 cup milk
1/8 teaspoon salt
1/2 cup quick-cooking oats
1 small box of raisins
1/2 teaspoon brown sugar
1/8 teaspoon cinnamon
Less than 1/8 teaspoon nutmeg
1 tablespoon chopped pecans

Directions:
1.  Combine apple juice, milk, and salt in a small saucepan; bring to a boil.
2.  Stir in oats and raisins; reduce heat slightly and cook for about 2 minutes.  Stir occasionally.  
3.  Stir in brown sugar, cinnamon and nutmeg.
4.  Spoon into a bowl.  Add a splash of milk, if desired.  Sprinkle with pecans.

Source:  Adapted from Cooking Light Annual Recipes 2001

March 15, 2011

Wallow Night - Part 2

Like I said before, one of the essential components of a wallow night is really good food.  Naturally, I chose cheesecake as part of my wallow meal!  

I cannot think of anything better than cheesecake.  I absolutely LOVE cheesecake.  It's funny; I didn't grow up eating it.  I don't think I actually had a piece of cheesecake until I was in college, and now it is my favorite dessert.

Although I love cheesecake, I am not such a fan of how unhealthy it is.  When I was flipping through some Cooking Light cookbooks, I found recipes for light cheesecakes and decided that I needed to try to make one.  

I was concerned that the cheesecake would not be firm enough because the recipe called for low-fat and fat-free cream cheese, but it turned out really well.  The texture was slightly different than the previous cheesecakes I have made.  It wasn't so dense, and it seemed a little "spongier."  It tasted amazing though!


Zebra-Stripe Cheesecake

Ingredients:

Crust - 
1 cup graham cracker crumbs (about 8 cookie sheets)
2 tablespoons butter, melted
Cooking spray

Filling - 
3 (8 ounce) blocks fat-free cream cheese, softened
1 (8 ounce) block 1/3-less-fat cream cheese, softened
1 cup sugar
1/2 cup 1% low-fat milk
2 teaspoons vanilla extract
2 large eggs
2 large egg whites
4 ounces semisweet chocolate, melted

Directions:
1.  Preheat oven to 325 degrees.
2.  To prepare crust, combine cracker crumbs and butter in a bowl; toss with a fork until moist.  Press into bottom of a 9-inch springform pan coated with cooking spray.
3.  To prepare filling, beat cheeses at high speed of a mixer until smooth.  Add sugar, milk, and vanilla, beating well.  Add eggs and egg whites, 1 at a time, beating well after each addition.  Pour half of cheese mixture into another bowl. Add chocolate to remaining batter.  Pour one-third of white batter into prepared pan.  Pour one-half of chocolate batter in center of white batter; spread to within 1 inch of edge of white batter.  Pour one-third of white batter in center of chocolate batter; spread to within 1 inch of edge of chocolate batter.  Pour remaining chocolate batter in center of white batter; spread to within 1 inch of edge of white batter.  Pour remaining white batter in center of chocolate batter; spread to within 1 inch of edge of chocolate batter.  The design on top should look like a target.
4.  Bake at 325 degrees for 1 hour and 10 minutes or until almost set.  Cheesecake is done when center barely moves when pan is touched.  Remove cheesecake from oven; run a knife around outside edge.  Cool to room temperature.  Cover and chill for at least 8 hours.

Source:  Cooking Light Annual Recipes 2001

March 13, 2011

Wallow Night - Part 1

I was in desperate need of a good wallow last night, and, being an expert on wallowing, I know that one of the most essential parts of a wallow night is some delicious and comforting food.  I had some pages marked in the cookbooks that just showed up at my house one day (that tends to happen when your mother is a librarian), and they turned out to be excellent wallow recipes.

I had always wanted to make risotto, but it intimidated me with all that stirring!  Plus, I had never cooked with wine before and had no idea what kind to use (thanks, Google, for helping me out with that one).  It turns out that making risotto was not all that difficult.  Sure, I burnt the onions a little, but you wouldn't even know it by the time the risotto was finished :-)   

I'm a huge fan of rice, and I loved the creaminess and richness of the risotto.  I threw a little extra parmesan and some salt and pepper on top to give it some extra flavor.  Let me just say, all of that stirring was totally worth it!


(Look, Lauren...I'm becoming a wine drinker!  Aren't you proud of me?!)
Basic Risotto

Ingredients:
3 (14.5 ounce) cans fat-free, less-sodium chicken broth
1 tablespoon olive oil
1/3 cup finely chopped onion
1-1/2 cups uncooked Arborio rice or other short-grain rice
1/3 cup dry white wine
1/4 cup grated fresh Parmesan cheese

Directions:
1.  Bring broth to a simmer in a medium saucepan (do not boil).  Keep warm over low heat.
2.  Heat oil in a large Dutch oven over medium-high heat.  Add onion; sauté 3 minutes.  Add rice; cook 1 minute; stirring constantly.  Stir in wine; cook 1 minute or until liquid is nearly absorbed, stirring constantly.  Add broth, 1/2 cup at a time, stirring constantly until each portion of broth is absorbed before adding the next (about 20 minutes total).  
3.  Remove from the heat; stir in cheese.

Source:  The Complete Cooking Light Cookbook
   

March 7, 2011

A Winner of a Dinner

I love pasta.  I always have, and I always will.  I used to say that macaroni and cheese was my favorite food (it still might be...shhh...don't tell).  I also love Mexican food, or at least the unauthentic Mexican food that we eat here in America.  When I saw this recipe, I knew I would adore it.  It's pasta with a taco flavor! It's Creamy Taco Mac!    


Not only was this dinner easy to make, it was also semi-healthy considering it calls for ground turkey instead of ground beef.  It was a hit in my household, and I would definitely recommend it!

Creamy Taco Mac

Ingredients:
1-1/4 pound ground turkey
8 ounces dry pasta shapes
1 small onion, chopped
1 clove garlic, minced
1 (14 oz) can diced tomatoes, drained
4 Tbsp taco seasoning
3 ounces cream cheese
1/2 cup sour cream
Salt and pepper
Shredded cheddar cheese, optional

Directions:
1.  Cook pasta according to package directions.  Drain, reserving 1/2 cup of pasta water.  Set aside.
2.  In a large skillet, cook turkey over medium-high heat until no longer pink.  A few minutes before turkey is cooked through, add the onions to the skillet.  Once turkey is cooked through, add the garlic and cook until fragrant, about 30 seconds.  Mix in the diced tomatoes and taco seasoning.  Let simmer for approximately 5 minutes.
3.  Stir in the cooked pasta, cream cheese, sour cream and reserved pasta water.  Continue stirring until the cream cheese is melted and the sauce is blended.  Season with salt and pepper to taste.
4.  Simmer over medium-low heat for 3-5 minutes.  Remove from the heat and sprinkle with cheddar cheese, if desired.

Source:  Annie's Eats, http://annies-eats.net

March 6, 2011

Triple-Tier Brownies

My best friend and I started "baking" together when we were in junior high school.  By "baking," I mean we would make cookie dough and eat it raw.  After a disastrous attempt to make cookie dough without the eggs, we discontinued that hobby of ours.  It had been awhile since we baked together, so when I went to visit her yesterday, we decided to try something new.  

I discovered this recipe for Triple-Tier Brownies (or Triple-Decker Brownies, as my mom mistakenly called them) in a Taste of Home cookbook and had been dying to try it out.  My best friend, graciously, obliged.  


If you are a chocolate lover...or a peanut-butter lover...or a cream-cheese-frosting lover...you will almost certainly like this recipe.  You might even love it.

Triple-Tier Brownies


Ingredients:
1 package fudge brownie mix (9" x 13" pan size)
1 package (11-1/2 ounces) milk chocolate chips
1 cup peanut butter
3 cups crisp rice cereal
1 can (16 ounces) cream cheese frosting
1 cup salted peanuts, chopped


Directions:
1.  Prepare and bake brownie mix according to the directions on the package for a 9" x 13" pan.  Cool brownies completely.
2.  In a large saucepan, combine chocolate chips and peanut butter.  Cook over low heat until blended, stirring occasionally.  Stir in cereal.
3.  Spread frosting over brownies.  Sprinkle with peanuts.  Spread with peanut butter mixture.  Chill for 30 minutes or until set.  Store in the refrigerator.  


Source: Taste of Home, www.tasteofhome.com