December 26, 2011

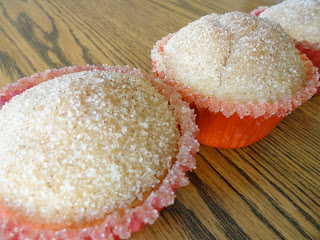
Cinnamon Sugar Doughnut Muffins

Who loves the mini doughnuts that are sold at fairs?  I do, I do!!!

Because of their crunchy cinnamon and sugar topping, these muffins remind me so much of mini doughnuts.  They were so simple and quick to make.  Plus, I had all of the ingredients on hand and didn't have to buy anything out of the ordinary in order to make them!


Cinnamon Sugar Doughnut Muffins


Ingredients:
1-3/4 cups flour
1-1/2 teaspoons baking powder
1/2 teaspoon salt
1/2 teaspoon nutmeg
1/4 teaspoon cinnamon
1/3 cup oil or melted butter
3/4 cup sugar
1 egg
3/4 cup milk


1/2 cup melted butter
3/4 cup sugar
1 teaspoon cinnamon


Directions:
1.  Preheat oven to 350 degrees and line 12 muffin cups with paper liners.
2.  Whisk together the flour, baking powder, salt, nutmeg, and cinnamon.
3.  In a separate bowl, whisk together the oil, sugar, egg, and milk.
4.  Add liquid ingredients to dry ingredients and stir just until moistened.  Pour batter into muffin cups.  Bake for 22-24 minutes or until muffins are golden.
5.  Combine sugar and cinnamon for topping.  When muffins are done, immediately remove from the pans, dip in the melted butter, and roll in the cinnamon and sugar mixture.


Source:  Sweet Pea's Kitchen
December 13, 2011

Smoked Cheddar Bacon Mac

So warm.  So comforting.  So delicious.  So perfect.


Smoked Cheddar Bacon Mac

Ingredients:
2 cups orrechiette or shell pasta
1 tablespoon butter
1 tablespoon flour
1/2 cup chicken stock
1 cup heavy cream (I used whole milk instead and it worked just as well)
1-2 cups grated smoked cheddar cheese
1/4 pound applewood smoked bacon, cooked and crumbled
1/4 cup panko bread crumbs
salt and pepper to taste
a pinch of nutmeg

Directions:
1.  Preheat oven to 400 degrees.  Meanwhile, cook pasta according to package directions.  Drain and set aside.
2.  In a small saucepan over medium-low heat, whisk butter and flour.  Add half of cream and half of chicken stock.  Add half of cheese, stirring continuously.  Alternately add more cream, chicken stock, and cheese until desired consistency is reached.  Continue to heat and stir.  Add salt, pepper, and nutmeg.
3.  Layer pasta and half of bacon in a casserole dish.  Top with cheese sauce and sprinkle with the rest of the bacon and bread crumbs.
4.  Bake for 15-20 minutes or until golden brown and bubbly.

Sourece:  How Sweet It Is

December 6, 2011

Beer Dip

I like drinking beer, but I LOVE baking and cooking with beer!  I repeat, I LOVE it...in all capital letters.  First I discovered these savory beer pork chops, then I discovered this amazing beer bread, and later I stumbled upon this delicious beer and cheddar risotto.  

Oh, but it didn't stop there!  My sister found the recipe for an addicting beer dip when we were celebrating my grandpa's birthday in beer-themed fashion.  It is to die for!  I made it again for my birthday and proceeded to eat most of it myself.  


Beer Dip

Ingredients:
2 packages (8 ounces each) cream cheese, softened
1/3 cup beer
1 envelope ranch salad dressing mix
2 cups shredded cheddar cheese
pretzels

Directions:
1.  In a medium bowl, beat cream cheese with an electric mixer until smooth.  
2.  Add beer and salad dressing mix and beat until smooth.
3.  Stir in shredded cheddar.
4.  Serve with pretzels and refrigerate leftovers.

November 28, 2011

White Chocolate Pumpkin Cheesecake

Have I mentioned how much I adore cheesecake?  It is my favorite dessert by far.  I've tried a few different recipes since I bought a springform pan a couple of years ago.  Some have been giant flops, and others have turned out beautifully.  This White Chocolate Pumpkin Cheesecake is the shining star of my cheesecake triumphs.  It was so delicious the first time I made it that I had to make it again!  


White Chocolate Pumpkin Cheesecake

Ingredients:
1-1/2 cups crushed gingersnap cookies (about 32 cookies)
1/4 cup butter, melted
3 packages (8 ounces each) cream cheese, softened
1 cup sugar
3 eggs, lightly beaten
1 teaspoon vanilla extract
5 squares (1 ounce each) white baking chocolate, melted and cooled
3/4 cup canned pumpkin
1 teaspoon ground cinnamon
1/4 teaspoon ground nutmeg
1/2 cup chopped almonds
2 tablespoons butter, melted
1 teaspoon sugar

Directions:
1.  Combine gingersnap crumbs and 1/4 cup melted butter.  Press onto the bottom of a greased 9-inch springform pan.
2.  Beat cream cheese and sugar until smooth.  Add eggs and vanilla.  Beat on low speed until combined.    Stir in white chocolate.
3.  Combine pumpkin and spices.  Carefully fold into cream cheese mixture.  Pour mixture over crust.  
4.  Place pan on a baking sheet.  Bake at 350 degrees for 55-60 minutes or until center is just set.  Cool on a wire rack for 10 minutes, and then run a knife around edge of pan.  Cool 1 hour longer.  Refrigerate overnight.
5.  To make almond topping, combine chopped almonds, 2 tablespoons melted butter, and 1 teaspoon sugar in a baking pan.  Bake at 350 degrees for 10 minutes or until golden brown.  Stir twice while baking, making sure almonds do not burn.  Cool.  Transfer to an airtight container and refrigerate until serving cheesecake.

Source: Taste of Home Best Holiday Recipes 2009

November 21, 2011

Tomato-Basil Grilled Cheese

I don't eat grilled cheese often, but I found this idea in a Taste of Home's Simple and Delicious magazine and gave it a try.  It was SO yummy.  I think I've eaten at least eight of them in the last two months.  The hint of fresh basil makes all the difference!

Look at those beautiful grill marks from my new George Foreman!
Tomato-Basil Grilled Cheese

Ingredients:
2 slices bread
2 slices mozzarella cheese
1/2 small tomato, sliced
3-4 fresh basil leaves, chopped
Butter

Directions:
1.  Butter each slice of bread on one side.  This side will be the outside of the sandwich.
2.  Layer one slice of mozzarella and tomato on non-buttered side of one slice of bread.  Sprinkle with chopped basil.  Top with second slice of mozzarella followed by second slice of bread.
3.  Grill sandwich in a skillet over medium-low heat, flipping when bread is golden brown and cheese is beginning to melt.  Continue to grill until second side is golden brown and cheese is completely melted.

Source:  idea from Taste of Home's Simple and Delicious

November 15, 2011

Roasted Apples

Can you believe that I didn't like apples for many, many years?!  Crazy, right?  I think I always associated apples with Red Delicious apples...and those are gross.  Thankfully, I discovered some tastier varieties a few years ago.  

Roasted apples are perfect for fall!  They're warm, sweet, and cinnamon-y.  They pair perfectly with ice cream, whipped cream, oatmeal, or yogurt.  They make your house smell heavenly as they're baking.  They are super easy to make and very inexpensive.  What more could you want?


Roasted Apples

Ingredients:
4 apples (Fuji works well!)
2 tablespoons brown sugar
1/2 teaspoon cinnamon
3 teaspoons vanilla
2 tablespoons cold butter, cut into small cubes

Directions:
1.  Preheat oven to 450 degrees.
2.  Peel and core apples.  Cut into large chunks.  Spread in 9" by 13" baking pan lined with foil.
3.  Combine brown sugar and cinnamon.  Sprinkle over apples.  Drizzle vanilla over apples.  Dot with cold butter.
4.  Bake for about 30-40 minutes, stirring once or twice.

Source:  Adapted from Not Without Salt

November 13, 2011

Where there's smoke, there's fire...or not...

Well, that was a first.  I set off the fire alarms in my apartment last night while cooking.  Whoops.  

I was making these delicious sweet potato fries for about the 5th time in the last month (they're THAT good), and I left them in a bit too long.  The super skinny ones got a little burnt, and the moment I pulled them out of the oven, the alarms started screaming.  So, my friend and I quickly grabbed some towels to fan the smoke detectors, and I whipped the windows open.  The screaming finally stopped, and then we enjoyed our delicious fries...with the windows still open, just in case.

As I was lying in bed, half awake, this morning, I could hear the fire alarms in a nearby apartment going off.  Somebody must have burnt their Sunday breakfast.  What a relief to know I'm not the only one who does it!


Sweet Potato Fries

Ingredients:
2 sweet potatoes
2 Tablespoons vegetable oil
2 teaspoons paprika
1 teaspoon salt
1 teaspoon garlic powder
1 teaspoon black pepper
1/2 teaspoon cumin

Directions:
1.  Preheat oven to 450 degrees.
2.  Rinse and dry sweet potatoes.  Cut into thin strips.  Place into a large bowl.
2.  Drizzle vegetable oil over sweet potatoes.  Sprinkle with spices.  Toss to coat.
3.  Lay the potatoes on a parchment-paper lined baking sheet.  Bake for 20-25 minutes or until slightly crispy, turning once during baking. 

Source:  Gimme Some Oven

November 9, 2011

Chocolate Peanut Butter Pudding

Tastes like a peanut butter cup.  Eaten with a spoon.  Enough said.


Chocolate Peanut Butter Pudding

Ingredients:
1/4 cup cornstarch
3/4 cup sugar
1/4 teaspoon salt
1/4 cup cocoa powder
3-1/2 cups half-and-half or whole milk
6 egg yolks
1 teaspoon vanilla
1/3 cup creamy peanut butter
1/2 cup chocolate chips


Directions:
1.  Sift together the cornstarch, sugar, salt, and cocoa powder in a medium saucepan.  Slowly whisk in the half-and-half or whole milk until smooth.  Add the egg yolks one at a time, whisking after adding each one.
2.  Cook the pudding over medium heat, whisking continuously.  When the pudding begins to chicken and bubbles begin to pop, reduce heat to low and cook for 1 more minute, stirring continuously.  
3.  When pudding is thick enough (to check, run a finger across the back of a spoon coated in the pudding to see if a trail remains), remove from the heat.  Add the vanilla, peanut butter, and chocolate chips.  Stir until smooth.
4.  Pour pudding into small bowls or one large bowl.  Cover the surface of the pudding with plastic wrap and refrigerate for at least 4 hours.
5.  Serve with whipped cream and sprinkles, if desired.

Source: iVillage 

November 7, 2011

Chocolate Bowls (aka - Flippin' Disaster)

I was hosting a little Halloween gathering with a couple of friends, and I wanted to make a unique treat.  I saw these chocolate bowls on Bakerella's blog, and I immediately thought they would be perfect.  They turned out to be a flippin' disaster.  Allow me to explain...

To make the bowls, you are supposed to melt some chocolate candy coating and dip balloons in it.  Then the coating is just supposed to magically dry, and when you pop the balloons, the bowls should be gorgeous.  This is not what happened for me.

Instead:

1.  I discovered that blowing up small balloons (I thought 4-inch ones would work well) was incredibly difficult...I nearly passed out.

2.  The directions clearly stated to spray the balloons with a little non-stick cooking spray.  Oops, forgot that step the first time.  The balloons did not peel off of the chocolate.  The chocolate actually collapsed after I popped the balloons and I had to start over.

3.  The directions also said to let the chocolate candy coating cool slightly.  Big oops!  I was working too quickly and the heat from the chocolate made a balloon explode.  Consequently, chocolate flew ALL OVER my kitchen.  It was a disaster.  I just found another splatter of it tonight...more than a week after the incident.  Ugh.

Although the process of making the chocolate bowls did not go as smoothly as I had hoped it would, all was well in the end, and the bowls made for a very cute presentation.  Stay tuned for a scrumptious pudding recipe to serve in the edible bowls!


Chocolate Bowls

Ingredients/Equipment:
Chocolate candy coating
Small balloons
Non-stick cooking spray

Directions:
1.  Blow up a few small balloons.  Wash and dry balloons.
2.  Melt chocolate candy coating in the microwave.  Let cool slightly.
3.  Spray balloons lightly with non-stick spray.
4.  Spoon small amounts of chocolate onto parchment-paper lined baking sheets to create bases for the bowls.
5.  Dip balloons into chocolate and then set on top of the bases on the parchment paper.  Allow to cool and harden thoroughly.
6.  Once chocolate is cooled and hardened, carefully pop balloons and remove balloon shreds.

Source: Bakerella 

November 1, 2011

Ravioli with Sun-Dried Tomatoes and Brown Butter Walnuts

Well, if that is not the longest name for a recipe ever, I don't know what is.  Despite its ridiculously long name, this dish is delish!  

I like making this one when I have company because it looks and tastes amazing, but really it's quite simple.  I made it for my parents when they came to visit me when I lived in Colorado, and I made it recently for my best friend.  You see, she can only eat good food when her husband is out of town (all he eats is cheese).  Since he was on a trip, we took advantage of the opportunity for Cindi to eat whatever she wanted!  Cindi's a talented photographer, and she took some great pictures.


Look at me add those sun-dried tomatoes to the brown butter!  Go me!


And that, my friend, is what good food looks like.

Ravioli with Sun-Dried Tomatoes and Brown Butter Walnuts

Ingredients:
1 package (16 ounces) refrigerated ravioli (We went with the frozen ravioli, and the package was a bit larger.  Everything still worked out perfectly.)
4 ounces butter
2 teaspoons Italian salad dressing mix
1/4 cup walnut pieces
1/3 cup sun-dried tomatoes, packed in oil, drained and julienned

Directions:
1.  Cook ravioli according to package directions.
2.  Melt butter in a skillet over medium to high heat.  Cook until golden and bubbling.
3.  Add Italian dressing mix, walnut pieces, and sun-dried tomatoes.  Heat through.
4.  Drain ravioli and toss ravioli with sauce.

Source: unknown (aka - found it in my recipe box)

October 30, 2011

Recipe for "The Perfect Autumn Morning"

The Perfect Autumn Morning

Ingredients:
Your best friend
Cozy pajamas
Pumpkin spice coffee
At least one episode of The OC
PUMPKIN PANCAKES!

Directions:
Combine all ingredients and enjoy lazily.

Photo by the lovely Cindi Carlson, whose husband Drew also takes amazing pictures.


Pumpkin Pancakes


Ingredients:
2 cups biscuit/baking mix
2 tablespoons brown sugar
2 teaspoons ground cinnamon
2 eggs
1 can (12 ounces) evaporated milk
1/2 cup canned pumpkin
2 tablespoons vegetable oil
1 teaspoon vanilla extract
Maple syrup


Directions:
1.  Combine baking mix, brown sugar, and cinnamon.  
2.  In a separate bowl, combine eggs, evaporated milk, pumpkin, oil, and vanilla.  Stir into dry ingredients and mix well.
3.  Pour batter by 1/3 cupfuls onto a greased, hot pan set over medium heat.  Turn pancakes when bubbles form on top of pancakes, and cook until second side is golden brown.
4.  Serve with maple syrup.


Source:  Taste of Home

October 27, 2011

Trial Pie #2

Like I mentioned previously, I had been "hired" to make pies for my uncle and his co-workers.  Since I didn't want to send them yucky pies, I did a trial run of the pies I was considering and made my immediate family vote on the best one.  

I knew I wanted to make my fabulous Apple Custard Pie, but I couldn't decide on the other one.  My family wasn't much help either...my mom had no opinion because she liked them both, my dad voted for this Vermont Maple Oatmeal Pie (and he's a fruit pie person), and my sister voted for the Sour Cherry Pie (and she's not a fruit pie person).  The only other person who was there to vote just said "Yes" when we asked what pie he thought I should make.  Great.

Ultimately, I decided to go with this Vermont Maple Oatmeal Pie.  It was a perfect fall pie.  Don't let the "oatmeal" part scare you if oatmeal doesn't tickle your fancy.  It's not immediately obvious that the pie contains oatmeal, and the maple flavor is amazing!


Vermont Maple Oatmeal Pie

Ingredients:
1 sheet refrigerated pie pastry (or your favorite homemade dough)
4 eggs
1 cup sugar
3 tablespoons all-purpose flour
1 teaspoon ground cinnamon
1/2 teaspoon salt
1 cup quick-cooking oats
3/4 cup corn syrup
1/2 cup maple syrup
1/4 cup butter, melted
3 teaspoons vanilla extract
1 cup flaked coconut

Directions:
1.  Unroll dough into a 9-inch pie plate and flute edges.
2.  In a large bowl, combine the eggs, sugar, flour, cinnamon, and salt.  Stir in the oats, syrups, butter, and vanilla.  Pour into crust.  Sprinkle coconut over top of pie.
3.  Bake at 350 degrees for 50-60 minutes or until set, covering edges with foil, if necessary to prevent overbrowning.
4.  Serve with ice cream if desired and refrigerate leftovers.

Source: Taste of Home

October 26, 2011

Trial Pie #1

My uncle works in the same school district that I do, and he and his co-workers have a lovely-sounding tradition of "Friday Pie-day."  I am a teensy bit jealous.  Well, it was his turn to bring the pies a couple of weeks ago, and he asked me to bake them.  I couldn't decide what kind of pies to make, but I wanted to make sure they were good before I gave them to people I do not know; therefore, I made a couple of trial pies and tested them out on my family.

This Sour Cherry Pie is...um...rustic looking.  To call it ugly would be mean.  All I have to say is, I was not getting along with the crusts that day.  Despite it's appearance, it was delicious.  My sister, who does not even like fruit pies all that much voted that I make this one for "Friday Pie-day!"


Sour Cherry Pie

Ingredients:
unbaked 9-inch double crust
2 cans (1 pound each) red tart cherries packed in water, drained and 1 cup of liquid reserved
1/3 cup firmly packed brown sugar
1/3 cup granulated sugar
1/4 cup cornstarch
1/2 teaspoon cinnamon
1-1/2 tablespoons butter-flavored shortening
1 tablespoon vanilla extract
1 teaspoon almond extract
milk 
granulated sugar

Directions:
1.  Preheat oven to 425 degrees.
2.  Combine brown sugar, granulated sugar, cornstarch, and cinnamon in a saucepan; stir in reserved cherry juice.  Cook and stir until mixture is thick and bubbly.  Boil and stir for 1 minute.  Add cherries and cook for 1 minute or until mixture comes to a boil.  Remove from heat.  Add shortening, vanilla, and almond extract.  
3.  Spoon filling into pan that has been prepared with the bottom layer of the pie crust.  Cover with top crust.  Fold and flute edges.  Cut slits or designs in top crust to allow steam to vent.  
4.  Brush top crust with milk and sprinkle with granulated sugar to create a glaze.
5.  Bake for 15 minutes.  Reduce heat to 350 degrees and bake for 25 minutes more or until crust is golden brown.  Cool.  

Source:  Great American Brand Name Baking

October 22, 2011

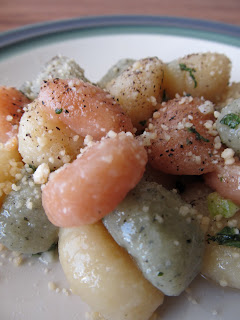
Gnocchi with Sage-Butter Sauce

I love fresh herbs, but I hate how expensive they are.  I don't like letting them go to waste when I have some leftover, so I normally search for a recipe in which I can use them up.  It would be nice if I could grow my own herbs, and then I wouldn't have to worry about wasting money.  However, I don't think I've grown anything in my entire life.  Wait...I take that back.  There was that biology class in college where we had to grow a plant.  I cannot, for the life of me, remember why we had to grow a plant...or what happened to the plant at the end of the semester...or how I ended up with an odd-duck of a lab partner.  Seriously, he was peculiar.  

It was while I was searching for a recipe to use up some fresh sage that I stumbled upon this one.  It was perfect except for one thing...gnocchi is so weird.  The word 'gnocchi' is just strange, and the food is pretty odd too.  They're little dumplings made out of potatoes, but the texture is way wrong.  Fortunately, once you can get past knowing that you're eating potatoes, while feeling like you're not eating potatoes, gnocchi is actually pretty delicious.  I truly enjoyed these little dumplings, slathered in a comforting, buttery sauce.


Gnocchi with Sage-Butter Sauce

Ingredients:
2 (12 ounce) packages potato gnocchi (I couldn't find 12 ounce packages, so I just bought one that was around 18 ounces.  I also chose the potato, tomato, and spinach variety...hence the pretty colors.)
1/4 cup butter
2 cloves garlic, minced
12 chopped fresh sage leaves, more or less according to preference
1/4 teaspoon salt

Black pepper
Grated Parmesan cheese

Directions:
1.  In a large pot of boiling, salted water, cook gnocchi for 2 to 3 minutes or until they float.  Drain.
2.  Melt the butter in a skillet over medium heat.  Stir in the garlic.  Cook until garlic has softened and is beginning to turn golden brown, about 4 minutes.
3.  Stir in the sage and salt for a few seconds.  Add the cooked gnocchi to the skillet.  Stir.
4.  Sprinkle with black pepper and Parmesan cheese.

Source: slightly adapted from allrecipes.com

October 18, 2011

Sloppy Joe Burgers

Need a super easy dinner?  Sloppy Joes normally do the trick.  

For my family, sloppy joes always meant browning some ground beef and adding a can of sloppy joe mix.  This recipe is just as easy, but it has a slight twist.  

Instead of a tomato-based sauce, it uses French onion soup.  I can honestly say that it took me only 45 minutes to make, eat, and clean up this dinner.  On top of that, it was tasty enough to eat the leftovers all week long.


Sloppy Joe Burgers

Ingredients:
1 pound ground beef
2 tablespoons all-purpose flour
1 can (10.5 ounces) condensed French onion soup, undiluted
1/4 teaspoon Worcestershire sauce
6 hamburger buns

Directions:
1.  In a large skillet, brown the beef over medium heat until no longer pink.  Drain if necessary.
2.  Stir in the flour, soup, and Worcestershire sauce.  Bring to a boil; cook and stir over medium heat for 2 minutes or until thickened.
3.  Serve on buns.

Source:  Taste of Home Busy Family Cookbook

October 16, 2011

Pumpkin Spice Latte

I wandered down the coffee aisle at Target today and "accidentally" bought three different kinds of coffee.  Whoops.  I probably didn't need three kinds.

On another note, I was super excited a few weeks ago when pumpkin-latte season started in all of the coffee shops, until I tried to buy one at a popular chain.  They claimed they were out of pumpkin syrup for the season.  The SEASON!  How is that even possible?!  It was barely October!

This recipe is a great substitute for the coffee-shop version of the pumpkin spice latte.  It's probably cheaper too!


This is one GIANT mug (yay, Sevilla!), and it was nearly full.  The recipe makes a lot!
Pumpkin Spice Latte

Ingredients:
1 cup brewed coffee
2/3 cup evaporated milk
2 tablespoons pumpkin puree
1 tablespoon brown sugar
1/8 teaspoon pumpkin pie spice

Whipped cream
Cinnamon

Directions:
1.  Combine coffee, evaporated milk, pumpkin puree, brown sugar, and pumpkin pie spice in a small saucepan.  Heat over medium-low heat until hot. 
2.  Pour into a mug.  Top with whipped cream and sprinkle with ground cinnamon.

Source: adapted from Hope Coffee Melody

October 6, 2011

Dexter Brownies

My sister and I are huge fanatics of Dexter, a highly inappropriate, but completely captivating, television series.  Seriously, HUGE fanatics.  We once watched 5 episodes in a row.  Thanks for getting me hooked, Jill!  

The new series of Dexter started on Sunday, and we were so excited, we decided to make some serial-killer themed treats.  You see, Dexter is a serial killer...who kills serial killers.  Nuts-o.

These Red Velvet Cheesecake Brownies fit the bill perfectly, being that they're red and the color red makes me think of blood.  The brownies were delicious!  They have a fudgy brownie base and a swirled cheesecake top (or they would have a swirled cheesecake top if I was any good at swirling).  Surprisingly, they were not too difficult to make!


Red Velvet Cheesecake Brownies

Ingredients:
1/2 cup butter
2-ounces dark chocolate, chopped
1 cup sugar
2 large eggs
1 teaspoon vanilla extract
1-1/2 teaspoons red food coloring
2/3 cup flour
1/4 teaspoon salt
8-ounces cream cheese, softened
1/3 cup sugar
1 large egg
1/2 teaspoon vanilla extract

Directions:
1. Preheat oven to 350 degrees.  Butter an 8-inch metal baking pan.  Line with parchment paper that extends over the sides of the pan.  Butter the parchment paper.
2.  In a small bowl, melt butter and chocolate together.  Stir to combine and set aside to cool.  
3.  In a large bowl, whisk together sugar, eggs, vanilla extract, and red food coloring.  Add chocolate mixture and stir until smooth.  Add flour and salt.  Stir until just combined.  Pour into pan and spread into an even layer.
4.  Beat cream cheese, sugar, egg, and vanilla extract in a medium bowl until smooth.  Distribute cheesecake mixture in dollops over batter in pan.  Swirl in with a knife.
5.  Bake for 35-40 minutes, or until brownies and cheesecake are set.  A knife inserted into the cheesecake mixture should come out clean.
6.  Let cool completely in pan on a cooling rack.  Lift brownies out of pan by lifting the parchment paper.

October 2, 2011

Good morning, pumpkin!

I am NOT obsessed with pumpkin...

...so what if my favorite part of fall is baking with pumpkin...

...and so what if I have pumpkin-scented hand soap in my kitchen...

...and big deal if I own about 4 pumpkin-scented candles...

...and does it really matter if I buy extra pumpkin and keep it in my cupboard in case of a shortage (it could happen!)...

...and so what if I have two different kinds of pumpkin Kashi bars in my pantry (one is crunchy and one is chewy, ya know?)...

...and big deal if the pumpkin spice cream cheese just jumped into my shopping cart while grocery shopping...

...and so what if I had pumpkin oatmeal for breakfast (2 days in a row) followed by a pumpkin latte with my lunch...

...this does not mean I have an obsession.  Does it?


Pumpkin Oatmeal

Ingredients:
1/2 cup water
1/2 cup milk
1/8 teaspoon salt
1/2 cup old-fashioned oats
1/2 teaspoon cinnamon
1/4 teaspoon pumpkin pie spice
pinch of cloves
1/4 cup pumpkin puree
1 tablespoon brown sugar (Don't skimp here!  I really think it needs the sweetness of the brown sugar!)
1 tablespoon chopped pecans

Directions:
1.  Heat water, milk, and salt to a boil in a saucepan.  Reduce heat to medium-low and add oats.  Cook for about 3 minutes or until thickened, stirring frequently.
2.  Add cinnamon, pumpkin pie spice, cloves, and pumpkin puree.  Cook and stir for 2 minutes or until it reaches desired consistency.
3.  Transfer oatmeal to a bowl.  Top with brown sugar and pecans.

Source:  barely adapted from Sweet Pea's Kitchen

October 1, 2011

It's PUMPKIN time!

Like I have said before, cookies have never been my favorite dessert.  I remember my mom making snickerdoodle cookies for my dad when I was younger.  They were his favorite, but they were probably my least favorite because there was not a hint of chocolate in them.  No chocolate?!  What kind of cookie doesn't contain chocolate?!  

Jump ahead about 14 years...I was looking for something pumpkin-y to bake last weekend because fall has arrived.  Pumpkin is my favorite part of fall, and I plan to make the most of pumpkin season.  Look out world!  I stumbled across a recipe for pumpkin snickerdoodles on one of my favorite blogs and was intrigued.  Plus, I knew my dad would be delighted.

These cookies were delightful!  They smelled heavenly while baking, they were perfectly soft on the inside and crispy on the outside, and the hint of pumpkin was just the right amount.  I am a snickerdoodle convert, but only if they contain pumpkin.

  
Pumpkin Snickerdoodles

Ingredients:
2-3/4 cups flour
2 teaspoons cream of tartar
1 teaspoon baking soda
1/2 teaspoon salt
1/2 teaspoon pumpkin pie spice
1-3/4 cups sugar, divided
2 sticks butter, softened
1 egg
3/4 cup pumpkin puree
2 tablespoons ground cinnamon

Directions:
1.  Heat the oven to 400 degrees and line a baking sheet with parchment paper.
2.  In a large bowl, whisk together the flour, cream of tartar, baking soda, salt, and pumpkin pie spice.
3.  In a separate bowl, cream the butter and 1-1/2 cups sugar until light and fluffy, about 2 minutes, using an electric mixer at medium speed.  Add the egg and beat until combined, about 30 seconds.  Add the pumpkin puree and beat at medium speed until combined, about 30 seconds.  Add the dry ingredients and beat at low speed until just combined, about 30 seconds.  Scrape sides of bowl with rubber spatula as necessary.
4.  Place the remaining 1/4 cup sugar and cinnamon in a shallow bowl.  Roll a heaping tablespoon of dough into a ball.  Roll the ball in the sugar mixture and place on prepared baking sheet.  Repeat with remaining dough.
5.  Bake the cookies for 10-12 minutes, or until edges are set and just beginning to brown but centers are soft and puffy.  Cool the cookies on the baking sheet for 5 minutes, and then remove them to a cooling rack to finish cooling.